December 29, 2014

Master Bathroom Refresh

With a few days off around the holidays, the gaybors found it hard to sit still. A staycation is just an opportunity to complete some house projects!

About the "Master Bathroom": it's tiny. There are no windows, despite having an outside facing wall. This area used to be the woodstove in the kitchen area, but the guy we bought the house from turned it into a 2nd bathroom, probably for resale value. I'm grateful for the 2nd bathroom and having one right by the main bedroom. The tiles are beautiful and there are nice custom cabinets above the toilet. But not enough storage or surfaces to place everyday items. At least once a week, I hear my wife cursing in the bathroom as something crashes to the ground because all we have is a tiny 3" deep x 20" wide shelf.

We painted the bathroom a few years ago a lovely Restoration Hardware navy blue. But it turned out too dark, and all my feng shui research says that blue and water-associated colors are to be avoided in the bathroom. Makes sense.


So we washed the walls, painted it Travertine (my favorite neutral paint color and also our kitchen color). It took two coats. I thought it might take more. But we got nice Valspar paint that supposedly had primer built in (a weird concept, but it covered really nicely).

In addition, we are putting in new art (a botanical print instead of an ocean scene), new (orange!) towels, and the biggest improvement - new custom redwood shelves above the toilet.

These are from a raw slab that came from Almquist Lumber. We had them make a couple cuts, then sanded and stained. The next post will be about how the installation went!


September 25, 2014

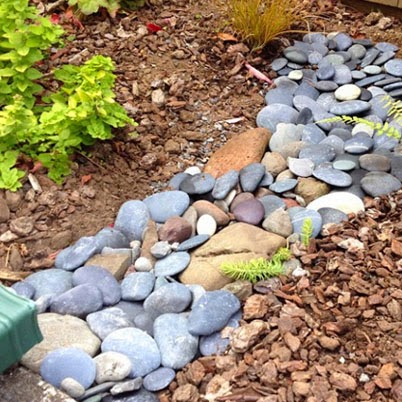
Mini Rain Garden

We have a downspout that collects more water than the others. We've had the gutters looked at by a pro and cleaned, so maybe this gutter is just more popular. Or the house is old and a little leansy (more likely).

One year at Thanksgiving (when we were getting ready to have a bunch of people over!) it rained cats & dogs and the area by the downspout pooled and flooded pretty badly. So I scooted down to Ace Hardware (which was open for at least part of the day - thanks Ace!) and got one of those plastic tube extensions that you can attach to the downspout and move the water away from the house.

This worked great - now the water all goes into a landscaped area away from the foundation and soaks in. But we decided to up the ante and make a little rain garden/dry creekbed to collect and distribute the water, and also look pretty!

So far, with the second real rain of the year it's working great. I can't wait for those little ferns and whatever those succulents are to get a little bigger and create more of a landscape feature.


September 20, 2014

House Painting Complete

This has been done for a couple of months, but I've been spending every spare moment of good weather out walking the dog or fussing in the yard, (not blogging in front of the computer!). But here is the good news: the exterior paint is complete and we are so happy with it!


Our painters did a great job. We also had the bonus experience of liking having them around, which is great when you have a bunch of dudes hanging around the house for a few weeks working on a project. They did a nice job matching the gutters to the color behind them, and they were very thorough and made sure that we had a thorough inspection and sign off.

We thought about eventually painting the front door, but the contrast of the exposed wood grain and the off-gray looks great. I don't think we'll be making any changes to the door finish! (We just saved ourselves some work there!)


We also added this little maple:


July 25, 2014

Exterior Painting Prep in Progress: Part II

The paint is going on, it's an exciting time! Here's a little patchwork of our samples and the wall color being painted on the walls first:


July 10, 2014

Exterior Painting Prep in Progress


Now that we've been through the arduous process of selecting colors, the long-awaited work has finally begun. We consider ourselves capable do-it-yourselfers, but there's no way we are prepared to research the process, acquire the equipment, and have time for such a big project. Maybe if we took a couple of weeks off this summer, but that's not going to happen. We are happily hiring professionals to paint the house.

Our guys are Custom Finishes. They came highly recommended by a family friend who has an 1800s Victorian in the neighborhood. We've been in the planning stages with Custom Finishes since March, so we were really excited to get on their project list for the summer.


They've power washed and have started scraping, sanding and filling. There are a few troubled spots on this old house - a few gaps and odd areas where the new windows were put in. It's been interesting to watch the process and layers of high-tech finishes to seal up those holes. From my perspective, it looks like this: power-washing, scraping, pulling out rusty nails, priming the bad spots, and putting a goopy black latex sealant for the scraped down areas. I'm really grateful to not be up on that ladder making it up as I go along!


July 4, 2014

Getting Crafty with Custom Paint


The skirting color we chose was a bust: too dark, and would fade and peel almost immediately (we were told). So our painter suggested we get crafty and mix the existing skirting color with the wall color to make a custom color, then we could get it matched at the paint store.

We tried mixing them both equally, it was a great-looking color, but too dark (colors 1 - 3). Adding the lightest trim color created a gray that was blue - which didn't go with our scheme at all. We tested custom colors until we got one that worked, the 7th one was a charm!

I can't even really tell you what colors are in here. I mixed the wall color (Benjamin Moore/Willow Creek) with the original trim color (Benjamin Moore/Wrought Iron), then threw in a little this and that from all the samples we bought. I don't think I could arrive on this color again if I tried, but I don't have to! The color has been immortalized on a greasy pizza box and the color-matching software program at the paint shop will mix it up.

June 19, 2014

Victorian Gem


I went down down the rabbit hole of the internet and ended up on local real estate listings today. Visit Humboldt posted a link to a Zillow survey about some home listings in Eureka, which happened to be close to the Manor. I clicked on the placeholder listing for our house, which had some fun photos from the listing when we bought it.

The home values are depressing (and out of date). We didn't buy in the height of the market, still - we're upside down, even more so with all the improvements we've put into the house. The changes we've made make it a better place to live and we're happy to do it because we can't help ourselves, but let's just say that the math is not working in our favor if we were to sell any time soon. But we didn't buy it as an investment, we bought it as a place to live. We love this house, and we're lucky enough to be able to afford the mortgage. So I'm not complaining!

Found some 2006 photos. I hated that mint green in the bedroom, but really liked the period staging they did for the house and the smell of antique old growth redwood when you walk in the door.

Also funny is the listing description, especially because it lists "fireplace", but neglects to mention that it's fully non-functional!

Victorian Gem near Henderson Center.
Seller will assist with creative financing. Beautifully refurbished. Move in ready. New kitchen w/new appliances and cabinets. French doors w/vintage glass. 11 ft. ceilings. hardwood floors, clawfoot tub, fireplace. Original doors & hardware. New paint, wiring, plumbing. Utility/laundry room. Large lot, alley access. Big attic space w/ hideaway stairs.

Neighborhood Description
Quiet street located within walking distance to neighborhood shops and boutiques. Desireable area in the heart of Eureka surrounded by homes with distinct, historic architectual style.


June 5, 2014

Housepaint selection process CONTINUES


We've stumbled upon a (nearly) winning paint combination! It looks good in the shade, the sun, the in-between. It's warm enough, and looks generally sharp - we're pretty excited about it! Here's the breakdown:

Benjamin Moore (from Ace)
Wall color: Willow Creek
Trim: Light Pewter
Skirting: Wrought Iron*

*Why an asterisk, you ask? We had our painter over to chime in on the colors and how he thought they would cover. He liked the wall and trim color, but brought up a very good point about the darkest color (Wrought Iron): it will fade heavily, and get really hot and peel, which is exactly what the current skirting color is doing on the south side of the house.

Le SIGH! But he's right. Since we've decided on 2 out of 3 colors, the last one shouldn't be too hard, right?

Our painter suggested mixing the wall color and trim color to maintain the essence of the color, but make it lighter so we won't have maximum fade. In progress, more pics of that to come!

May 12, 2014

Housepaint Selection Drama

The test patches of paint throughout the exterior are growing. our first paint sample was a total bust. What looked like a lovely warm gray on the card appeared as mint green on the house. Mint green is exactly the opposite of the color palette we're going for.

That was a bummer, so we tried a few more colors - this time much richer colors with no green. Those turned out ok - the gray is very nice but might look a little bland on a foggy day. And the trim ("Black bean") is very bold, but a little too brown.


We are on the third batch of test colors/trips to the paint store. I don't even know - they are starting to blend together. I like them all the same. I've done lots of Pinterest research, but unless they list exact color codes and brands, it's all the more confusing. We'll keep at it!


April 11, 2014

Exterior Paint Color Combo #1


Here is our first attempt at a color combination. The Collonade Gray will be the wall/main color, the Origami White for trim, and the Fawn Brindle for the skirting and porch. They look great on screen and on the paper samples, but we'll see how they translate on the house. The lower left corner of the above image was left blank to show what no color looks like in comparison.

I'm going to get sample pints of each of these this weekend and begin testing on the house. This means it's really happening! Gulp!

March 25, 2014

This Summer's Project: Exterior Paint


The house had just been painted when we bought it 7 years ago, but the paint hasn't held up very well. As with any old house, there are cracks that have been filled in over the years with material that probably can't stand up to the rain and sun on the south-facing side of the house.

In addition, the painter missed a few spots (quite a few, actually!). We didn't notice this until after buying the house and moving in. I guess he didn't much like going up on ladders!


This is a blessing in disguise, because we wanted to redo the color scheme anyway! The current pink and brown are fitting for a Victorian, but two of my least favorite colors!

We've gotten a few color samples. We're thinking a warm gray or taupe with white trim, and leaving the door its natural wood color (at least for now). I'm crazy about gray as a base color with earth tones in the foreground (dare I say, "pops of color"??).

Here's a sample paint inspiration on a much fancier house than ours:

Photo credit here.

You may be wondering, after all of our hands-on success with the Patio Project: will the Strubgrasses be the ones to pressure-wash, scrape, fill, brush, spray, and roll this paint on? Hell no! We are currently taking bids and excited to hand this project off to someone who knows what they're doing (and who likes going up on ladders!).

January 21, 2014

Keepin' it Rustic


I take a great deal of inspiration from DesignSponge.com and recently read a feature on fireplaces. I was surprised that many of the Interior Decorator photo worthy fireplaces are non-functional like ours. This is why I love DesignSponge - nothing has to be perfect, it just has to be well-designed and loved.

I dream of a functioning fireplace or woodstove, which would be BRILLIANT in our (chilly, high-ceilinged) living room. That project is a little daunting, however. We'd be looking at tearing out the wall, ripping out the coal chimney brick by brick, and installing either a woodstove or gas line. Although I prefer woodstoves, gas log fireplaces are actually pretty great, too. I used to scoff at them until I stayed at a place that had one. Honestly - they put out consistent heat and are super cozy.

In the meantime, we've kept the historically accurate mantle half-finished (full story on that here) and fitting of the period.