March 9, 2016

Goodbye to the Manor


This has been a tough decision for us. After months of considering it (years, really) we have decided to leave Humboldt. There have been many factors to our decision, but we're confident we're doing the right thing and very excited about our next chapter in Portland, Oregon.

One of the toughest factors and reasons we have stayed (perhaps longer than we should have), is Strubgrass Manor. We have made a great life here and associate being grown-ups and being happy in this house. We got married in the backyard, enjoyed daily romps & games of fetch with Mattie, and enjoyed countless amazing meals in the kitchen.

We have carefully planned and taken pleasure in updating and planning many details. From the architectural Master Plan, to installing the patio, to the satisfying demo & remodel of the kitchen, living here has been a wonderful experience and most of all, a really wonderful place to be for many years. Between watching youtube videos on how to install kitchen tile, to Laura's surprise skill at replacing lighting fixtures and electrical work, we have learned so much about what are priorities when fixing up a home. We also learned when to do it yourself and when to hire someone - and when to hold your horses on spending the big money to make major changes.

We love the street, our neighbors, every plant on the lot (which we planted! except for the Rhododendron out front, every growing thing on the lot is from our time here), and leaving is bittersweet.

We have accepted an offer from a local family that is very excited about the house and the community. We know that they will be as happy here as we have been.

We plan to buy a house in Portland as soon as we close out the Manor. Standby for a new blog about Strubgrass Lodge

August 18, 2015

An inexpensive upgrade: A new toilet seat!


You wouldn't think it would be that much of a change, but life has improved significantly with the installation of this new, soft-close toilet seat. Before the update, we lived like barbarians with a slamming toilet lid. I don't know how we put up with it for so long: the careful closing of the lid, the unnerving slamming of the lid! Awoken from a peaceful slumber by your partner groggily slamming the lid shut! We lived like ANIMALS!

I read somewhere that you're supposed to replace the toilet lid every couple years. That seems a little often and wasteful, but every few years or so makes sense. It's like a new toilet, one that doesn't smack closed. Pure luxury for only $16!!

March 6, 2015

2015 Already?!

I can't believe the last blog post for the Manor was in December. The Master bathroom refresh is complete and the rough-edge shelves are awesome. We are enjoying the clutter-free arrangement and lighter color in the small space! There's nothing like freshly painted bathroom baseboards!


I have been thinking about our home-renovation philosophy and always having a project going. We have a master plan that involves a porch conversion, and a few more large scale landscaping projects that I'm chomping at the bit to get done. House/garden projects are my favorite creative outlet, but lately I've felt a the need to dial back the big $$$ projects. There are two reasons: the first is that it's probably foolish to spend all one's money on home improvements, and more importantly: it's also unwise to invest so much into an asset that isn't really appreciating. Comparable houses in the neighborhood are selling for way less than we bought our house.

I'm fine with being a little upside down or flat in value. We didn't buy the house as an investment really, but rather a place to live. But it seems silly to pour every spare dollar into a house that has flat (at best!) value 7 years after purchase.

Part of launching the blog was to keep track of the improvements to the property, to see how far we've come, and to loosely keep track of the time and money we've put in. And it's been a lot. The roof, kitchen, fence, front landscaping, front door, patio, insulation, security system, exterior paint - we're talking thousands of dollars over the years (not to mention the blood sweat & tears!)

Most years, we have a plan for what projects we're saving up for. For 2015, we're switching gears. We're maintaining everything, doing a little garden work, but not spending the moolah. We can continue with the upgrades that don't cost anything and keep them more in line with what the neighborhood and markets will support.

Ongoing posts will consist of less hammer and nail kind of stuff, and more posts of things like: flower arrangements (yes, I'm a sucker for those!), garden edibles, plants that I dug up from one part of the yard and replanted in another (a favorite free hobby), and hopefully clutter clearing projects.

December 29, 2014

Master Bathroom Refresh

With a few days off around the holidays, the gaybors found it hard to sit still. A staycation is just an opportunity to complete some house projects!

About the "Master Bathroom": it's tiny. There are no windows, despite having an outside facing wall. This area used to be the woodstove in the kitchen area, but the guy we bought the house from turned it into a 2nd bathroom, probably for resale value. I'm grateful for the 2nd bathroom and having one right by the main bedroom. The tiles are beautiful and there are nice custom cabinets above the toilet. But not enough storage or surfaces to place everyday items. At least once a week, I hear my wife cursing in the bathroom as something crashes to the ground because all we have is a tiny 3" deep x 20" wide shelf.

We painted the bathroom a few years ago a lovely Restoration Hardware navy blue. But it turned out too dark, and all my feng shui research says that blue and water-associated colors are to be avoided in the bathroom. Makes sense.


So we washed the walls, painted it Travertine (my favorite neutral paint color and also our kitchen color). It took two coats. I thought it might take more. But we got nice Valspar paint that supposedly had primer built in (a weird concept, but it covered really nicely).

In addition, we are putting in new art (a botanical print instead of an ocean scene), new (orange!) towels, and the biggest improvement - new custom redwood shelves above the toilet.

These are from a raw slab that came from Almquist Lumber. We had them make a couple cuts, then sanded and stained. The next post will be about how the installation went!


September 25, 2014

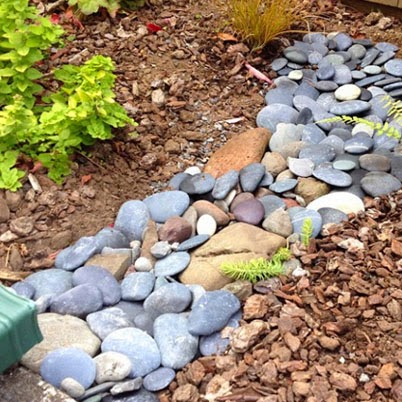
Mini Rain Garden

We have a downspout that collects more water than the others. We've had the gutters looked at by a pro and cleaned, so maybe this gutter is just more popular. Or the house is old and a little leansy (more likely).

One year at Thanksgiving (when we were getting ready to have a bunch of people over!) it rained cats & dogs and the area by the downspout pooled and flooded pretty badly. So I scooted down to Ace Hardware (which was open for at least part of the day - thanks Ace!) and got one of those plastic tube extensions that you can attach to the downspout and move the water away from the house.

This worked great - now the water all goes into a landscaped area away from the foundation and soaks in. But we decided to up the ante and make a little rain garden/dry creekbed to collect and distribute the water, and also look pretty!

So far, with the second real rain of the year it's working great. I can't wait for those little ferns and whatever those succulents are to get a little bigger and create more of a landscape feature.


September 20, 2014

House Painting Complete

This has been done for a couple of months, but I've been spending every spare moment of good weather out walking the dog or fussing in the yard, (not blogging in front of the computer!). But here is the good news: the exterior paint is complete and we are so happy with it!


Our painters did a great job. We also had the bonus experience of liking having them around, which is great when you have a bunch of dudes hanging around the house for a few weeks working on a project. They did a nice job matching the gutters to the color behind them, and they were very thorough and made sure that we had a thorough inspection and sign off.

We thought about eventually painting the front door, but the contrast of the exposed wood grain and the off-gray looks great. I don't think we'll be making any changes to the door finish! (We just saved ourselves some work there!)


We also added this little maple:


July 25, 2014

Exterior Painting Prep in Progress: Part II

The paint is going on, it's an exciting time! Here's a little patchwork of our samples and the wall color being painted on the walls first:


July 10, 2014

Exterior Painting Prep in Progress


Now that we've been through the arduous process of selecting colors, the long-awaited work has finally begun. We consider ourselves capable do-it-yourselfers, but there's no way we are prepared to research the process, acquire the equipment, and have time for such a big project. Maybe if we took a couple of weeks off this summer, but that's not going to happen. We are happily hiring professionals to paint the house.

Our guys are Custom Finishes. They came highly recommended by a family friend who has an 1800s Victorian in the neighborhood. We've been in the planning stages with Custom Finishes since March, so we were really excited to get on their project list for the summer.


They've power washed and have started scraping, sanding and filling. There are a few troubled spots on this old house - a few gaps and odd areas where the new windows were put in. It's been interesting to watch the process and layers of high-tech finishes to seal up those holes. From my perspective, it looks like this: power-washing, scraping, pulling out rusty nails, priming the bad spots, and putting a goopy black latex sealant for the scraped down areas. I'm really grateful to not be up on that ladder making it up as I go along!


July 4, 2014

Getting Crafty with Custom Paint


The skirting color we chose was a bust: too dark, and would fade and peel almost immediately (we were told). So our painter suggested we get crafty and mix the existing skirting color with the wall color to make a custom color, then we could get it matched at the paint store.

We tried mixing them both equally, it was a great-looking color, but too dark (colors 1 - 3). Adding the lightest trim color created a gray that was blue - which didn't go with our scheme at all. We tested custom colors until we got one that worked, the 7th one was a charm!

I can't even really tell you what colors are in here. I mixed the wall color (Benjamin Moore/Willow Creek) with the original trim color (Benjamin Moore/Wrought Iron), then threw in a little this and that from all the samples we bought. I don't think I could arrive on this color again if I tried, but I don't have to! The color has been immortalized on a greasy pizza box and the color-matching software program at the paint shop will mix it up.

June 19, 2014

Victorian Gem


I went down down the rabbit hole of the internet and ended up on local real estate listings today. Visit Humboldt posted a link to a Zillow survey about some home listings in Eureka, which happened to be close to the Manor. I clicked on the placeholder listing for our house, which had some fun photos from the listing when we bought it.

The home values are depressing (and out of date). We didn't buy in the height of the market, still - we're upside down, even more so with all the improvements we've put into the house. The changes we've made make it a better place to live and we're happy to do it because we can't help ourselves, but let's just say that the math is not working in our favor if we were to sell any time soon. But we didn't buy it as an investment, we bought it as a place to live. We love this house, and we're lucky enough to be able to afford the mortgage. So I'm not complaining!

Found some 2006 photos. I hated that mint green in the bedroom, but really liked the period staging they did for the house and the smell of antique old growth redwood when you walk in the door.

Also funny is the listing description, especially because it lists "fireplace", but neglects to mention that it's fully non-functional!

Victorian Gem near Henderson Center.
Seller will assist with creative financing. Beautifully refurbished. Move in ready. New kitchen w/new appliances and cabinets. French doors w/vintage glass. 11 ft. ceilings. hardwood floors, clawfoot tub, fireplace. Original doors & hardware. New paint, wiring, plumbing. Utility/laundry room. Large lot, alley access. Big attic space w/ hideaway stairs.

Neighborhood Description
Quiet street located within walking distance to neighborhood shops and boutiques. Desireable area in the heart of Eureka surrounded by homes with distinct, historic architectual style.


June 5, 2014

Housepaint selection process CONTINUES


We've stumbled upon a (nearly) winning paint combination! It looks good in the shade, the sun, the in-between. It's warm enough, and looks generally sharp - we're pretty excited about it! Here's the breakdown:

Benjamin Moore (from Ace)
Wall color: Willow Creek
Trim: Light Pewter
Skirting: Wrought Iron*

*Why an asterisk, you ask? We had our painter over to chime in on the colors and how he thought they would cover. He liked the wall and trim color, but brought up a very good point about the darkest color (Wrought Iron): it will fade heavily, and get really hot and peel, which is exactly what the current skirting color is doing on the south side of the house.

Le SIGH! But he's right. Since we've decided on 2 out of 3 colors, the last one shouldn't be too hard, right?

Our painter suggested mixing the wall color and trim color to maintain the essence of the color, but make it lighter so we won't have maximum fade. In progress, more pics of that to come!

May 12, 2014

Housepaint Selection Drama

The test patches of paint throughout the exterior are growing. our first paint sample was a total bust. What looked like a lovely warm gray on the card appeared as mint green on the house. Mint green is exactly the opposite of the color palette we're going for.

That was a bummer, so we tried a few more colors - this time much richer colors with no green. Those turned out ok - the gray is very nice but might look a little bland on a foggy day. And the trim ("Black bean") is very bold, but a little too brown.


We are on the third batch of test colors/trips to the paint store. I don't even know - they are starting to blend together. I like them all the same. I've done lots of Pinterest research, but unless they list exact color codes and brands, it's all the more confusing. We'll keep at it!


April 11, 2014

Exterior Paint Color Combo #1


Here is our first attempt at a color combination. The Collonade Gray will be the wall/main color, the Origami White for trim, and the Fawn Brindle for the skirting and porch. They look great on screen and on the paper samples, but we'll see how they translate on the house. The lower left corner of the above image was left blank to show what no color looks like in comparison.

I'm going to get sample pints of each of these this weekend and begin testing on the house. This means it's really happening! Gulp!

March 25, 2014

This Summer's Project: Exterior Paint


The house had just been painted when we bought it 7 years ago, but the paint hasn't held up very well. As with any old house, there are cracks that have been filled in over the years with material that probably can't stand up to the rain and sun on the south-facing side of the house.

In addition, the painter missed a few spots (quite a few, actually!). We didn't notice this until after buying the house and moving in. I guess he didn't much like going up on ladders!


This is a blessing in disguise, because we wanted to redo the color scheme anyway! The current pink and brown are fitting for a Victorian, but two of my least favorite colors!

We've gotten a few color samples. We're thinking a warm gray or taupe with white trim, and leaving the door its natural wood color (at least for now). I'm crazy about gray as a base color with earth tones in the foreground (dare I say, "pops of color"??).

Here's a sample paint inspiration on a much fancier house than ours:

Photo credit here.

You may be wondering, after all of our hands-on success with the Patio Project: will the Strubgrasses be the ones to pressure-wash, scrape, fill, brush, spray, and roll this paint on? Hell no! We are currently taking bids and excited to hand this project off to someone who knows what they're doing (and who likes going up on ladders!).

January 21, 2014

Keepin' it Rustic


I take a great deal of inspiration from DesignSponge.com and recently read a feature on fireplaces. I was surprised that many of the Interior Decorator photo worthy fireplaces are non-functional like ours. This is why I love DesignSponge - nothing has to be perfect, it just has to be well-designed and loved.

I dream of a functioning fireplace or woodstove, which would be BRILLIANT in our (chilly, high-ceilinged) living room. That project is a little daunting, however. We'd be looking at tearing out the wall, ripping out the coal chimney brick by brick, and installing either a woodstove or gas line. Although I prefer woodstoves, gas log fireplaces are actually pretty great, too. I used to scoff at them until I stayed at a place that had one. Honestly - they put out consistent heat and are super cozy.

In the meantime, we've kept the historically accurate mantle half-finished (full story on that here) and fitting of the period.

November 28, 2013

Fall Plantings: A few Natives


I usually think of Spring as the time to plant, but I read somewhere that Fall can also be good because you don't have to worry about watering new starts. This must apply only to hearty plants - probably not for annuals or something will freeze easily.

I planted these guys in September and they are still tiny, but hanging in there! The grass is from the Samara Restoration folks at Farmer's Market. This was part of their concept for a Rain Garden, using native plants that can help soak up the run-off and thrive in wet conditions. I've seen these grasses all over, mostly in the bottoms or forest edges. The little guys are Coral Bells propagated from other starts around the Manor.

October 28, 2013

Excess Patio Materials Finally Find a Good Home


Although the new patio has been complete for months, the project hasn't felt finished because the backyard still looked like a construction zone. Of the 3 pallets of Basalite pavers we bought, we used a little more than half. The excess pavers have sat there, and sat there. They have been piled on pallets smack dab in the middle of the yard, irking me. For 6 months they sat there while we passively thought about what to do with them. I am not proud of this. That's the problem with D.I.Y. projects - you can't blame anyone else for taking a long time to clean up the worksite!

I posted the pavers on Facebook to see if any friends would take them - no luck. What lousy friends I must have to not help solve this heavy dilemma (kidding!). I asked my dad - who said he would take them, but I think he was just being polite.

Finally, we got our act together and posted them on craigslist. We figured we would have to negotiate and deal with a bunch of people. We did have a couple of fake-outs early in the week - people who had questions about the pavers, but didn't really want them. Hey, that's ok - such is the way of craigslist and trying to move awkward, heavy objects off your property.

But then the magical offer came in: "Have Trailer and Cash, interested in pavers". A day later, we were helping our customer load the rest of the pavers and sand into his trailer. I'm not sure how he made it home with what was likely over a ton of concrete pavers and sand in the back of a converted truckbed trailer. I remember learning a valuable lesson when towing some of the equipment we used to install the patio: it's not the hauling, it's the stopping of the vehicle in front of a heavy load. I didn't read anything on Lost Coast Outpost about a guy with an overloaded trailor wreaking havoc on the freeway, so all's well that end's well!

And now the grass can finally start growing back. It's a beautiful thing!


August 24, 2013

The Manor Goes Social

The nice folks at Keep Eureka Beautiful snapped a pic of the Manor and posted it on Facebook. They post a house or two a day - there are some really beautiful ones in mid-town Eureka. so many of these great old houses are within a few blocks. I'm glad someone's calling attention to all these great historical homes - all roughly similar styles, but wildly different styles of color, landscaping, & details.


August 6, 2013

Late Summer Garden Update: 2013

We spent most of the early spring focused on the patio project  and put in the vegetable garden late. Still, the strawberries, zucchini, lettuce, & carrots are all plugging along. But nothing is doing phenomenally well, or even as well as last year.

Landscaping
A couple of plants are filling out, like this Smoke Plant that took the place of a miscellaneous grassy area. I really like these, even if they are bare most of the year.

Apple Tree
This little guy has 4 wimpy apples on it. Last year, it had 10+ apples, and the year before it had 5. Maybe we didn't water enough? Or didn't talk nicely enough to it, since we were too busy cursing at the patio heavy equipment. I'm pretty sure pollination wasn't an issue, since the backyard has been full of happy bees this year, and the leaves look pretty healthy. Maybe some years are just apple-ier than others?

Blueberries
These guys have surprised us this year. We planted them 2 years ago in this area and this year they have been producing enough berries to go out almost every day and have a few. We've been careful not to let Mattie see us picking them, because we know for a fact that she is part deer and can nibble them off by herself.

Cherry Tree
Ok, it's not actually our tree, but it overhangs the fence, so we help ourselves to whatever's on our side :) They were really good this year! Not quite as sweet as a couple years ago, but good enough to make cherry clafoutis quite a few times.

Raised Beds
Strawberries were good, but a little late and kind of small. Lettuce has been successful - we got 2 batches in so far. The peas did alright, we planted the second generation now and it's starting to come up. Carrots: a little thin starting out (snails? cats??) but plugging along now.


June 14, 2013

Patio part 6: Completion!


We finished the patio a few weeks ago, but finally.. here is the much anticipated "The Patio is Finished!" post. Wrapping up the paver installation included: more compaction, more sand, and quite a bit of sweeping sand into the cracks. There was also a 1.5" - 2" edge one one side (nobody's perfect!) which we filled with rocks and gravel.

We were waiting for an opportunity to remove the Dirt Pile (thanks to Laura and Bryan!) We finally had a chance to clean up the job site a little, including spending the better part of a day loading up the dirt and driving it over to Wes Green Landscaping, who took it for free).

Instead of using concrete pavers by the shed door and pathway, we installed gravel with stepping stones to differentiate the space from the patio area (above). Plus, it was easier.

The exciting part of this project was that we spent about 1/4th of the cost of what the estimate was. Sure, it was a ton of work and we had no idea what we were doing until we did it - but we saved a ton of $$$!